用 Hugo 做自己的網站,接上自己的網域

整份講義交給 Claude Code 帶你做
把下面這段貼給你的 Claude Code,它會當你的助教:讀這份講義,一步一步帶你做,邊做邊教你每一步的關鍵字,不是自己默默做完。沒裝 Claude in Chrome 也可以:後台要點的地方,它會一次講一個動作,你照講義的截圖點。
請當我的助教,照這份講義帶我把自己的網站做出來並上線:
https://ta-day-hugo-handout.pages.dev/

重點是讓我聽懂關鍵字,不是你默默做完。做完之後,我聽到這些詞,要知道它是什麼、在五步裡的哪一站。

開始前
- 用 curl 把講義完整抓下來讀完(不要只看摘要),照講義的第 0~5 步順序做。
- 先問我兩件事再動手:
  1. 網站主題是什麼。講義用柯基當範例,裡面的 corgi-site、柯基、/corgi/ 都要換成我的主題;版型的配色和排版也照我的主題設計,不要照抄範例。
  2. 名字想叫什麼。資料夾、GitHub repo、Cloudflare 專案預設用同一個名字,英文小寫加減號。

分工
- 第 0~2 步(安裝 Hugo、建站、推上 GitHub):你直接在終端機做。每一步做完,照講義的「做完會看到」檢查,把結果給我看,再做下一步。
- 第 3~5 步(Cloudflare 後台):先試著用你的瀏覽器工具開後台。開得了就你來點,我看著;開不了就直接改成一次只講一個動作(按哪個按鈕、填什麼),我做完回報或貼截圖,你再講下一個。
- 第 3 步一定要照講義設 HUGO_VERSION。部署失敗時,請我把組建記錄檔貼給你。

邊做邊教我關鍵字
- 我是第一次架網站。操作你來做,我不用學會自己打指令;我要懂的是關鍵字。
- 每一步動手前,先講現在走到五步圖的第幾站,再教這一步的關鍵字。一個詞只講一句白話,加一個生活上的比喻,不要長篇解釋:
  第 0 步:終端機、Hugo
  第 1 步:Markdown、版型(layout)、Tailwind、本機預覽
  第 2 步:Git、commit、push、repo
  第 3 步:部署、建置、環境變數
  第 4 步:網域、續約
  第 5 步:DNS、HTTPS
- 講完就動手。做到的時候指給我看:「這就是剛剛說的 ○○」。
- 指令不用逐行解釋,我問了再講。一步一停,不要一口氣連跑好幾步。
- 每一步做完,用一行幫我複習這一步的關鍵字。
- 我說「講快一點」就少解釋,我說「這啥」就講得更白話。

一定要停下來等我
- 需要登入、授權(GitHub、Cloudflare)時,我自己來。我弄好會說「好了」,你再繼續。
- 買網域的付款和聯絡資料我自己填,你不要代填信用卡。買之前先提醒我講義「買之前先知道」那幾點。
- 每次 git push 之前(包含改 baseURL 那兩次),照講義最後的補充檢查:有沒有金鑰、密碼、個資、公司內部數據,並列出會推上去的檔案給我看,我說可以才 push。repo 開私人。

卡住時
- 先對照講義的「常見卡點」。畫面跟講義不一樣,以我看到的為準,把差異告訴我。

全部做完
- 給我三個網址:GitHub repo、pages.dev、我自己的網域。
- 把今天所有關鍵字整理成一張表給我:關鍵字、一句話說明、出現在第幾步。
- 從表裡抽 3 個問我,我用自己的話回答,你幫我修正。
- 登入、授權、付款你自己來:它會停下來等你,弄好跟它說「好了」
- 想自己一步一步做:往下照第 0~5 步走,每一步也有單獨的指令可以貼
一個網站從你的電腦到上線,走這 5 步
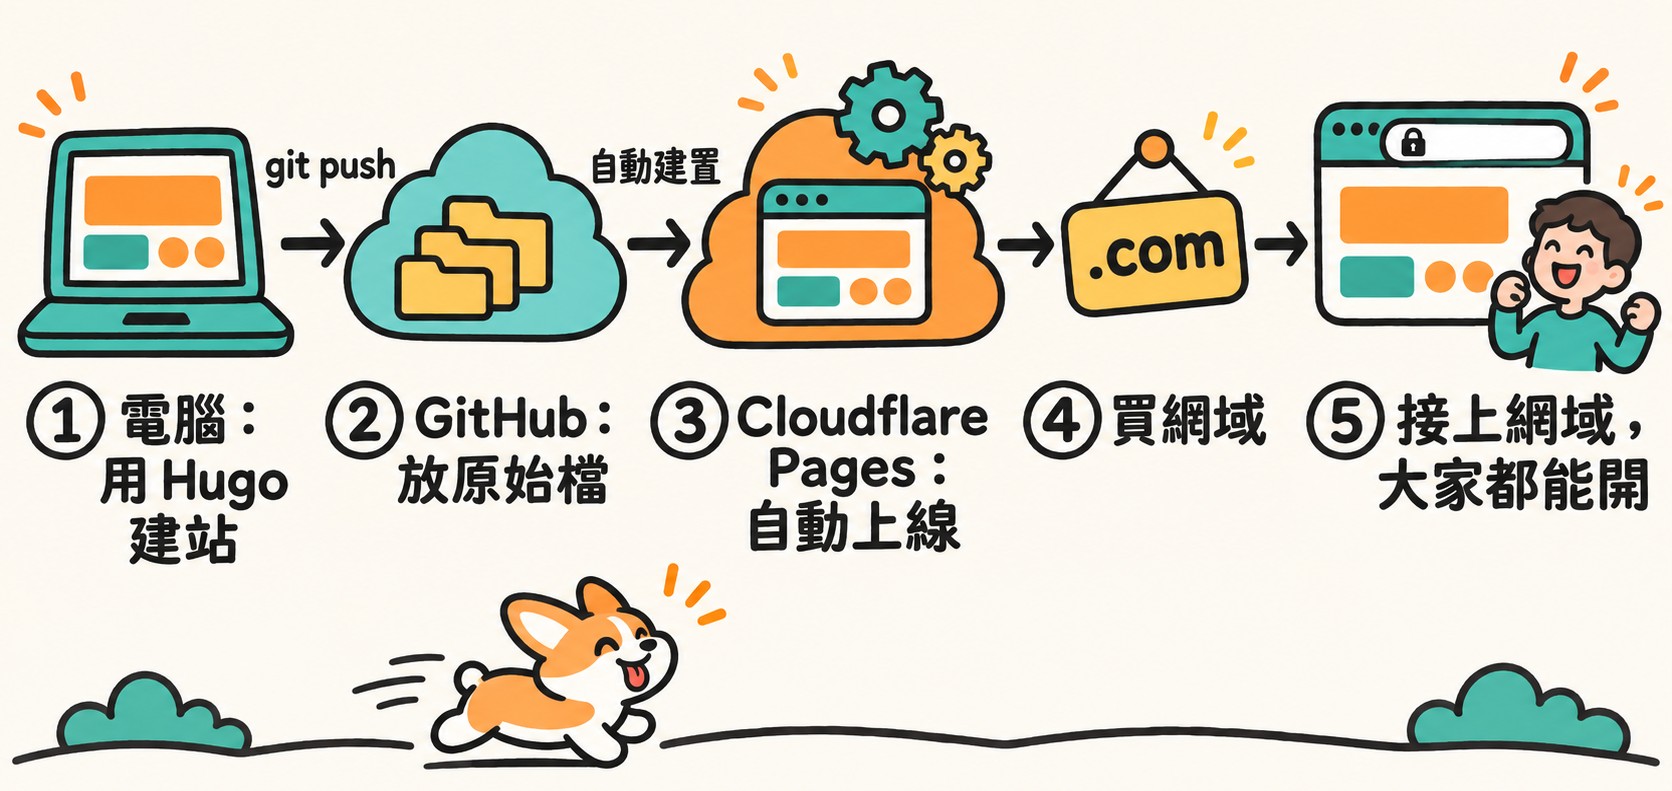
| 步驟 | 在哪裡做 | 做完拿到什麼 |
|---|---|---|
| 0 先安裝 Hugo | 自己電腦的終端機 | hugo version 有版本號 |
| 1 用 Hugo 建站 | 自己電腦 | 瀏覽器開 localhost:1313 看得到網站 |
| 2 放上 GitHub | 終端機 → GitHub | 一個放原始檔的 repo |
| 3 Cloudflare Pages 部署 | Cloudflare 後台 | 你的專案名.pages.dev 網址 |
| 4 買網域 | Cloudflare 後台 | 自己的網址,例如 corgi-station.com |
| 5 接上網域 | Cloudflare 後台 | 打自己的網址,開出自己的網站 |
重點:你只在自己電腦改內容。推上 GitHub 之後,Cloudflare 會自動重新建置、上線。
開始前,先確認這 5 樣
- Claude Code:Agent 工作坊裝過的那個
- GitHub 帳號:放網站的原始檔
- Cloudflare 帳號:Email 要先驗證過,不然不能買網域
- Git:終端機打
git --version有出現版本號就有 - 信用卡:買網域用(.com 一年約 US$11)
Hugo 還沒裝沒關係,下面第 0 步就是裝它。
先安裝 Hugo
hugo version,出現 0.160 以上的版本號。Hugo 是「把文字檔變成網站」的工具,電腦預設沒有,要先裝。沒做這一步,後面全部跑不動。
-
1打開終端機,先檢查有沒有裝過
hugo version
- 出現版本號,而且是 0.160 以上 → 直接跳到第 1 步
- 出現
command not found(找不到指令)→ 往下裝
-
2照自己的電腦,貼一行指令安裝
電腦 安裝指令 Mac brew install hugoWindows winget install -e --id Hugo.Hugo.Extended -
3再打一次
hugo version確認
不想自己打指令:交給 Claude Code
幫我檢查這台電腦有沒有裝 Hugo(跑 hugo version)。
沒有的話幫我裝最新版,裝完再跑一次 hugo version 給我看結果。
$ hugo version
hugo v0.170.0+withdeploy darwin/arm64 BuildDate=2026-11-13T14:17:19Z VendorInfo=Homebrew
這是 Mac 實測的畫面。v0.170.0 那一段就是版本號,數字比 0.160 大就可以。
| 狀況 | 解法 |
|---|---|
Mac 出現 brew: command not found | 還沒裝 Homebrew。到 brew.sh 複製首頁那一行指令貼到終端機,裝完再跑 brew install hugo |
| 版本比 0.160 舊 | Mac 跑 brew upgrade hugo;Windows 跑 winget upgrade Hugo.Hugo.Extended |
| Windows 裝完還是找不到 hugo | 把終端機整個關掉重開,再打一次 hugo version |
| Windows 要用哪個終端機 | Hugo 官方說不要用「命令提示字元」和舊的「Windows PowerShell」,請用 PowerShell 7 或 Git Bash |
今天的範例:一個有 3 種頁面的網站

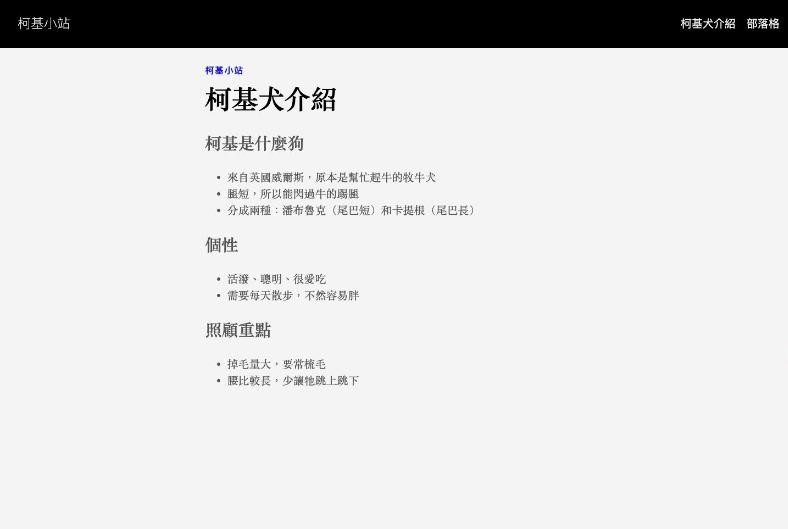

實際打開看:corgi-site.pages.dev。題目換成你自己的就好,柯基只是示範。
| 頁面 | 檔案放哪裡 | 網址 |
|---|---|---|
| 首頁 | content/_index.md | / |
| 內頁:柯基犬介紹 | content/corgi.md | /corgi/ |
| 部落格列表 | content/posts/_index.md | /posts/ |
| 部落格文章 | content/posts/文章名.md | /posts/文章名/ |
corgi-site/
├─ hugo.toml           ← 網站設定:名稱、網址、上方選單
├─ content/            ← 內容:你寫的文字都在這裡(Markdown)
│  ├─ _index.md        ← 首頁
│  ├─ corgi.md         ← 柯基犬介紹
│  └─ posts/           ← 部落格
│     ├─ _index.md
│     ├─ first-walk.md
│     └─ bath-day.md
└─ layouts/            ← 版型:網站長什麼樣子(HTML+Tailwind)
   ├─ baseof.html      ← 每一頁共用的外框:頁首、選單、頁尾
   ├─ home.html        ← 首頁的版型
   ├─ page.html        ← 內頁、文章的版型
   └─ section.html     ← 列表頁的版型(部落格)
內容和版型是分開的:改文字動 content/,改外觀動 layouts/。這個範例沒有用現成主題,版型是自己寫的,樣式用 Tailwind。
在電腦上建出網站
幫我用 Hugo 建一個網站,資料夾叫 corgi-site。

1. 先跑 hugo version 確認 Hugo 是 0.160 以上。
2. 不要用現成主題。自己在 layouts/ 寫版型:baseof.html(每頁共用的外框)、home.html(首頁)、page.html(內頁和文章)、section.html(列表頁)。
3. 樣式用 Tailwind CSS。在 baseof.html 的 head 加這一行就好,不用另外安裝:
   <script src="https://cdn.jsdelivr.net/npm/@tailwindcss/browser@4"></script>
4. 做三種頁面:首頁、柯基犬介紹(網址 /corgi/)、部落格(網址 /posts/,先放兩篇文章)。
5. 上方選單放「柯基犬介紹」和「部落格」。
6. 所有文章的 draft 都設成 false。hugo.toml 加上 disableKinds = ['taxonomy', 'term']。
7. 做完用 hugo server 開起來,告訴我要開哪個網址。
Tailwind 用「一行引入」最省事,不用另外安裝,適合先上線。Tailwind 官方說這種方式是給開發階段用的;網站要長期經營時,再請 Claude Code 改成正式建置。
手動指令備查(想自己打的人看這裡)
① 建站
hugo new site corgi-site
cd corgi-site
git init
② 把 hugo.toml 改成這樣
baseURL = 'https://example.org/'
locale = 'zh-tw'
title = '柯基小站'
disableKinds = ['taxonomy', 'term']

[menus]
  [[menus.main]]
    name = '柯基犬介紹'
    pageRef = '/corgi'
    weight = 10
  [[menus.main]]
    name = '部落格'
    pageRef = '/posts'
    weight = 20
③ 新增 layouts/baseof.html(每頁共用的外框,Tailwind 那一行在這裡)
<!doctype html>
<html lang="zh-Hant-TW">
<head>
  <meta charset="utf-8">
  <meta name="viewport" content="width=device-width, initial-scale=1">
  <title>{{ if .IsHome }}{{ site.Title }}{{ else }}{{ .Title }}|{{ site.Title }}{{ end }}</title>
  {{ with .Description }}<meta name="description" content="{{ . }}">{{ end }}
  <script src="https://cdn.jsdelivr.net/npm/@tailwindcss/browser@4"></script>
</head>
<body class="min-h-screen flex flex-col bg-amber-50 text-stone-800">

  <header class="bg-white border-b-4 border-stone-800">
    <div class="max-w-3xl mx-auto px-6 py-4 flex items-center justify-between">
      <a href="{{ site.Home.RelPermalink }}" class="text-xl font-black">{{ site.Title }}</a>
      <nav class="flex gap-5 font-bold">
        {{ range site.Menus.main }}
        <a href="{{ .URL }}" class="hover:text-orange-700 hover:underline">{{ .Name }}</a>
        {{ end }}
      </nav>
    </div>
  </header>

  <main class="flex-1 w-full max-w-3xl mx-auto px-6 py-10">
    {{ block "main" . }}{{ end }}
  </main>

  <footer class="border-t-4 border-stone-800 bg-white">
    <div class="max-w-3xl mx-auto px-6 py-5 text-sm font-bold text-stone-600">© {{ now.Year }} {{ site.Title }}</div>
  </footer>

</body>
</html>
④ 新增 layouts/home.html(首頁)
{{ define "main" }}
<section class="rounded-3xl border-4 border-stone-800 bg-orange-300 px-8 py-12 text-center">
  <h1 class="text-5xl font-black">{{ .Title }}</h1>
  {{ with .Description }}<p class="mt-4 text-xl font-bold">{{ . }}</p>{{ end }}
</section>

<div class="mt-8 text-lg leading-8">{{ .Content }}</div>

<h2 class="mt-12 text-2xl font-black">最新文章</h2>
<div class="mt-4 grid gap-5 sm:grid-cols-2">
  {{ range first 4 (where site.RegularPages "Section" "posts") }}
  <a href="{{ .RelPermalink }}" class="block rounded-2xl border-4 border-stone-800 bg-white p-5 hover:bg-teal-50">
    <time class="text-sm font-bold text-teal-700">{{ .Date.Format "2006-01-02" }}</time>
    <h3 class="mt-1 text-xl font-black">{{ .Title }}</h3>
    <p class="mt-2 text-stone-600">{{ .Summary | plainify | truncate 60 }}</p>
  </a>
  {{ end }}
</div>
{{ end }}
⑤ 新增 layouts/page.html(內頁和文章)
{{ define "main" }}
<article>
  {{ if not .Date.IsZero }}<time class="text-sm font-bold text-teal-700">{{ .Date.Format "2006-01-02" }}</time>{{ end }}
  <h1 class="mt-1 text-4xl font-black">{{ .Title }}</h1>
  {{ with .Description }}<p class="mt-3 text-lg font-bold text-stone-600">{{ . }}</p>{{ end }}

  <div class="mt-8 text-lg leading-8 [&_h2]:mt-10 [&_h2]:mb-3 [&_h2]:text-2xl [&_h2]:font-black [&_h2]:text-teal-800 [&_p]:my-4 [&_ul]:my-4 [&_ul]:list-disc [&_ul]:pl-6 [&_li]:my-1 [&_a]:text-orange-700 [&_a]:underline">
    {{ .Content }}
  </div>
</article>
{{ end }}
⑥ 新增 layouts/section.html(部落格列表)
{{ define "main" }}
<h1 class="text-4xl font-black">{{ .Title }}</h1>
{{ with .Description }}<p class="mt-3 text-lg font-bold text-stone-600">{{ . }}</p>{{ end }}

<div class="mt-8 grid gap-5 sm:grid-cols-2">
  {{ range .Pages.ByDate.Reverse }}
  <a href="{{ .RelPermalink }}" class="block rounded-2xl border-4 border-stone-800 bg-white p-5 hover:bg-teal-50">
    <time class="text-sm font-bold text-teal-700">{{ .Date.Format "2006-01-02" }}</time>
    <h2 class="mt-1 text-xl font-black">{{ .Title }}</h2>
    <p class="mt-2 text-stone-600">{{ .Summary | plainify | truncate 60 }}</p>
  </a>
  {{ end }}
</div>
{{ end }}
⑦ 新增頁面,再開預覽
hugo new content corgi.md
hugo new content posts/first-walk.md
# 打開剛產生的 .md,把 draft = true 改成 draft = false,再寫內容

hugo server
# 終端機會顯示網址,通常是 http://localhost:1313/
# 按 Ctrl + C 停止
- 瀏覽器開
http://localhost:1313/,畫面跟上面範例的 ① 首頁一樣,上方有兩個選單 - 點「柯基犬介紹」「部落格」都開得起來,部落格列表有兩篇文章
| 狀況 | 原因和解法 |
|---|---|
| 新增的文章沒出現 | Hugo 新增的文章預設是草稿。把檔案最上面的 draft = true 改成 draft = false |
| 改了內容沒變 | hugo server 開著時存檔就會自動更新;關掉了就重新跑一次 |
| 畫面只有黑字白底,沒有樣式 | layouts/baseof.html 的 head 裡少了 Tailwind 那一行,或電腦沒連上網路 |
放上 GitHub
幫我把 corgi-site 推到我的 GitHub,開一個新的私人(private)repo 叫 corgi-site。

1. 先加 .gitignore,把 public/、resources/_gen/、.hugo_build.lock 排除。
2. 列出這次會被推上去的檔案給我看,確認沒有密碼、金鑰、個資。
3. commit 之後推到 main 分支。
4. 做完給我 repo 的網址。
手動指令備查
① 在 corgi-site 資料夾新增 .gitignore,內容三行
public/
resources/_gen/
.hugo_build.lock
② commit
git add .
git commit -m "first commit"
③-A 有裝 GitHub CLI(gh):一行開 repo 並推上去
gh repo create corgi-site --private --source . --push
③-B 沒有 gh:到 github.com 右上角「+」→ New repository,名字填 corgi-site,選 Private,不要勾 Add README,建好後照畫面上的指令
git remote add origin https://github.com/你的帳號/corgi-site.git
git branch -M main
git push -u origin main
- 打開
github.com/你的帳號/corgi-site,看得到hugo.toml、content、layouts
- repo 建議開私人(Private):私人 repo 一樣能接 Cloudflare Pages。原因看最後的補充
- 不要把 public 資料夾推上去:那是建置出來的成品,Cloudflare 會自己重新建一次
用 Cloudflare Pages 部署
你的專案名.pages.dev 網址,任何人都能開。這一段在 Cloudflare 後台用滑鼠點。截圖裡黃框+數字就是要點的地方。截圖是深色模式,你的畫面可能是淺色。
-
1左側選單點「運算」,再點「Workers 和 Pages」
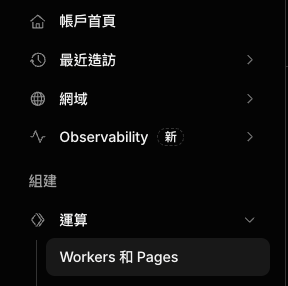 1
-
2右上角按「建立應用程式」
 2
-
3看到「建立新項目」時,不要按 Continue with GitHub。按最下面那行小字的「前往 Pages」
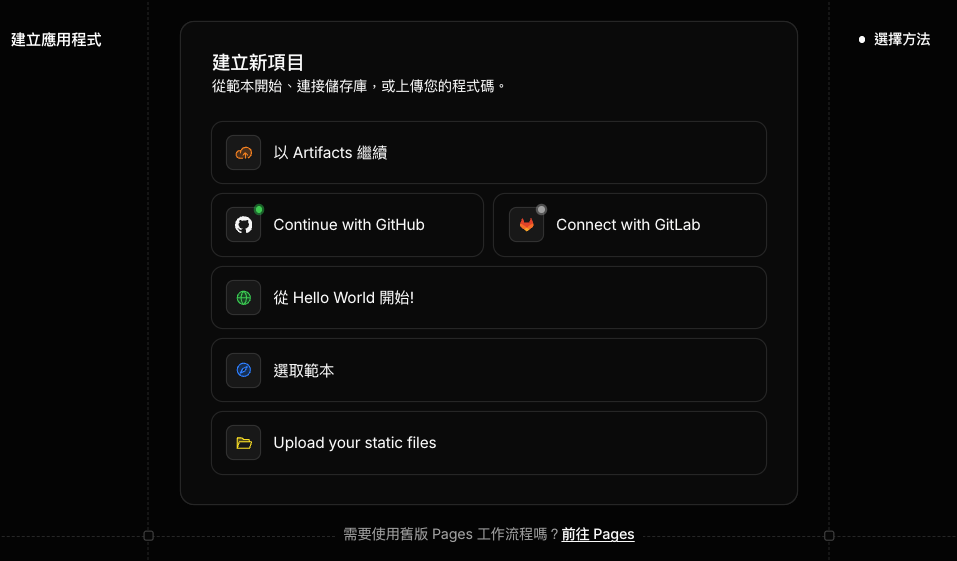 3
上面那些選項是另一個產品(Workers)的流程,今天不走那條。 -
4「匯入現有 Git 存放庫」那一列,按右邊的「開始使用」
 4
-
5「GitHub 帳戶」選自己的帳號 → 點選
corgi-site→ 按「開始設定」
第一次用會先跳到 GitHub 要你授權,按 Install & Authorize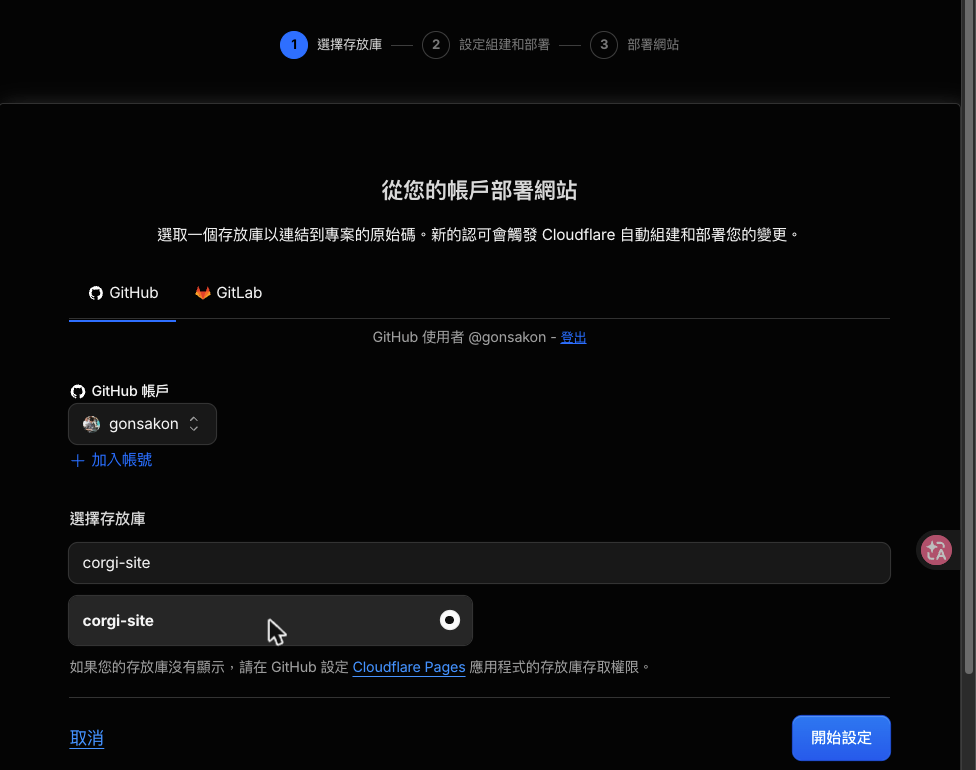 1
2
① 點自己的 repo,右邊的圓點變實心 → ② 開始設定 -
6同一頁設 3 個地方,第 ② 個最重要:
- ① 「Framework 預設」選 Hugo。組建命令
hugo、組建輸出目錄public會自動填好 - ② 展開「環境變數 (進階)」→「+ 新增變數」→ 變數名稱
HUGO_VERSION、值0.170.0 - ③ 按「儲存並部署」
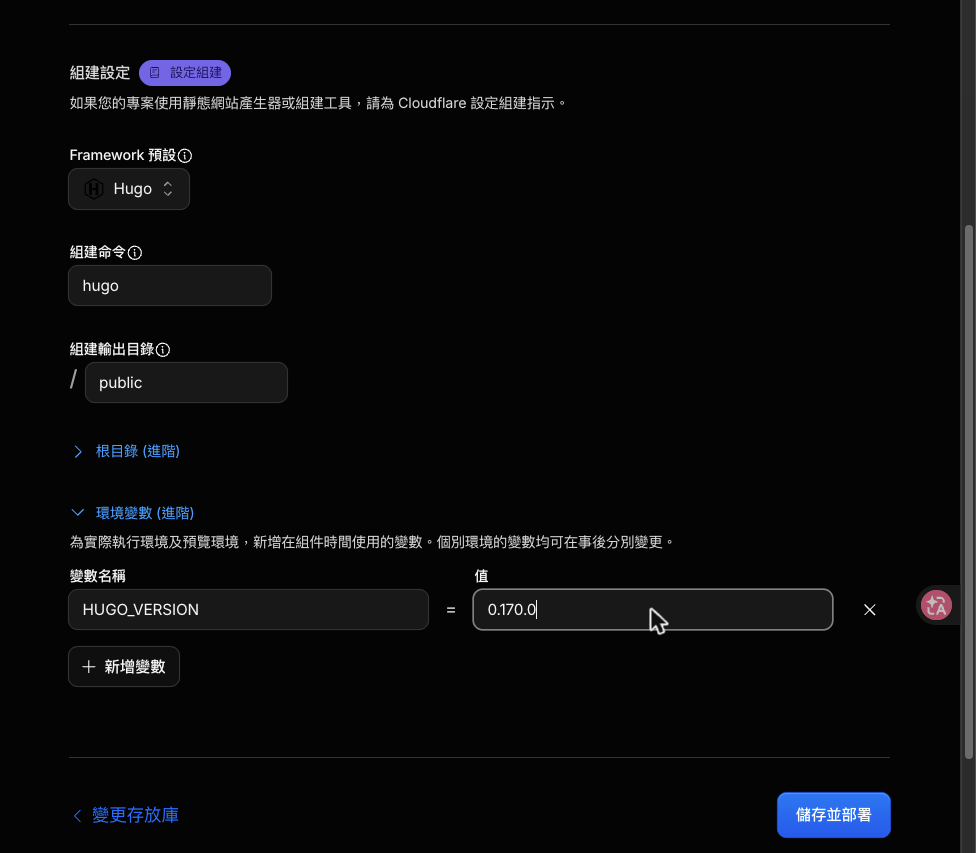 1
2
3
- ① 「Framework 預設」選 Hugo。組建命令
-
7等大約 1 分鐘,看到「成功!」,點畫面上的網址就能開
 7
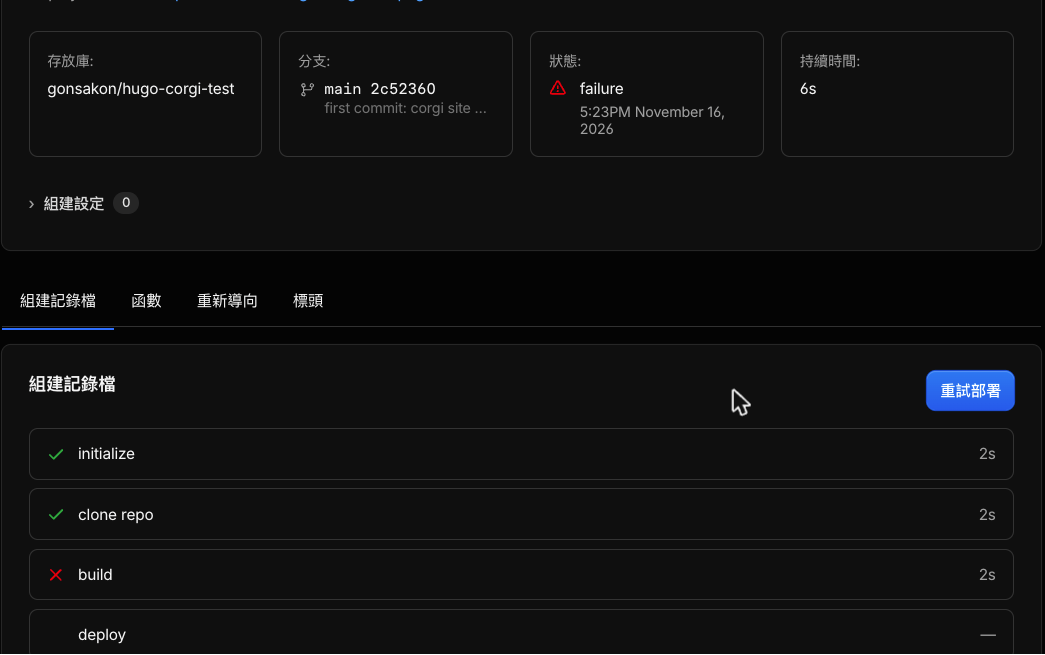 ✕
HUGO_VERSION 和 0.170.0 →「儲存」,再推一次 commit 就會重新部署。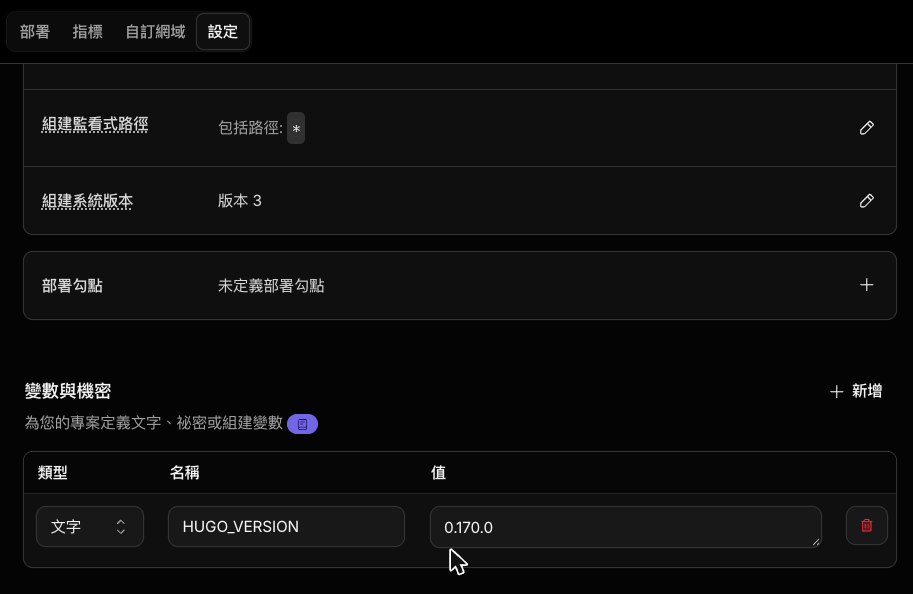 1
2
部署成功後:把網址寫回設定檔
把 hugo.toml 的 baseURL 改成 https://我的專案名.pages.dev/(結尾要有斜線),commit 之後 push。
- 專案頁「部署」分頁,最新一筆的 Status 有勾勾 ✓
- 打開
https://你的專案名.pages.dev/,三種頁面都跟本機一樣 - 之後每次
git push,Cloudflare 都會自動重新部署,約 1 分鐘上線
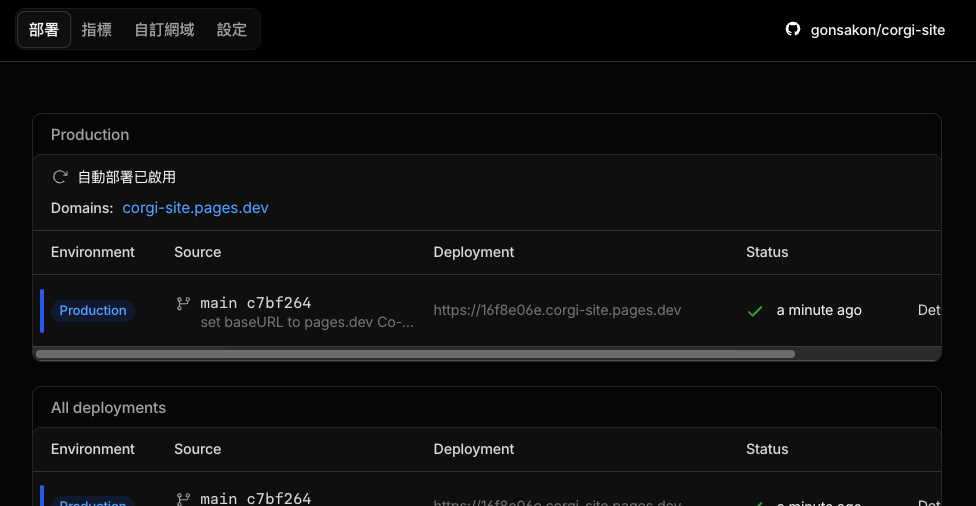 ✓
在 Cloudflare 買網域
corgi-station.com。-
1左側選單「網域」→「註冊」→ 右上角「購買網域」
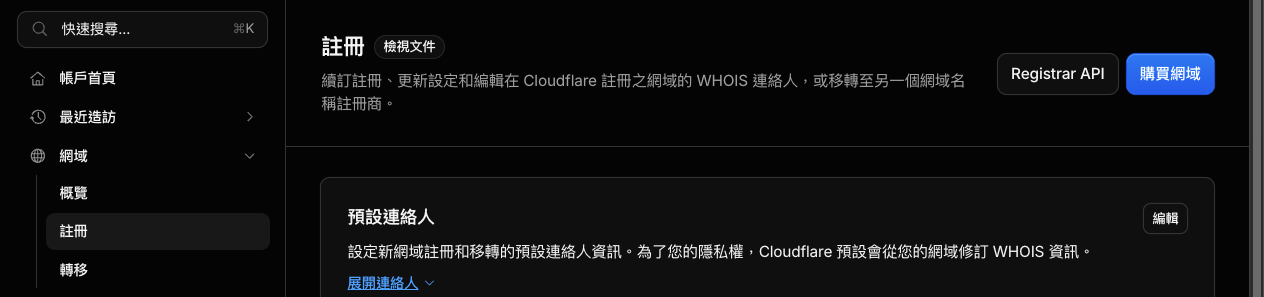 1
2
-
2在搜尋框打想要的名字(英文、數字、減號),按 Enter。每一格都有兩個價錢:大字是第一年,小字是每年續約
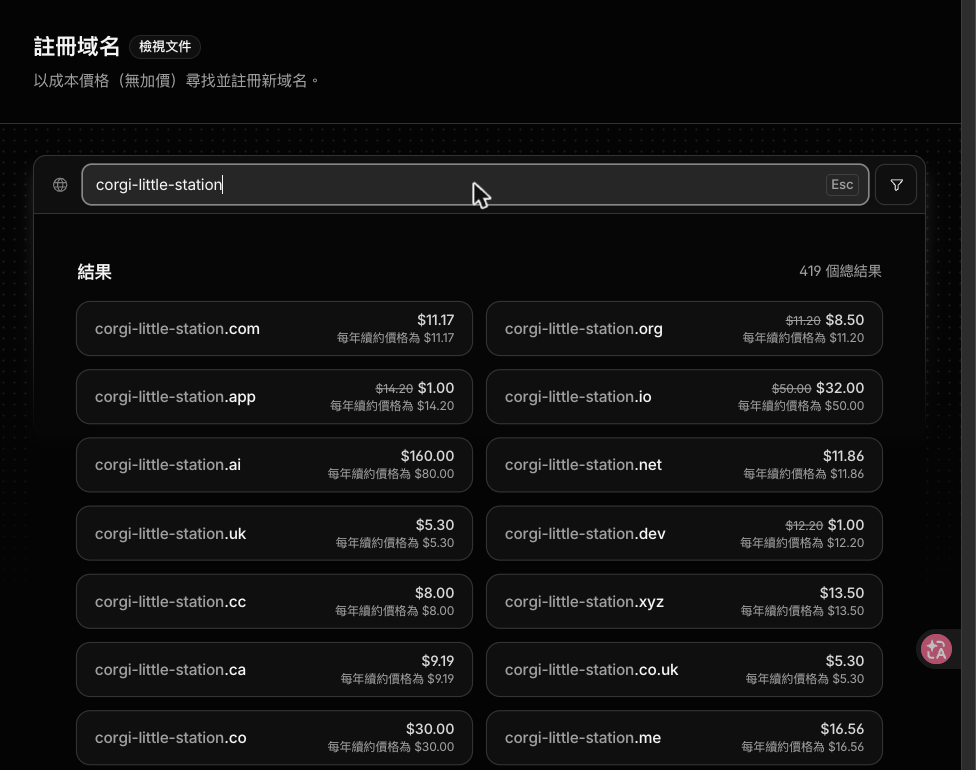 1
2
① 打名字 → ② 挑一個點進去。價錢單位是美元/年。 -
3點進去 → 選年數 → 填聯絡資料 → 選付款方式 → 完成購買(Complete purchase)
-
4到信箱收驗證信,點裡面的連結
價錢參考(2026/11/16 在後台查到,美元/年)
| 結尾 | 第一年 | 每年續約 |
|---|---|---|
| .com | $11.17 | $11.17 |
| .org | $8.50 | $11.20 |
| .dev | $1.00 | $12.20 |
| .app | $1.00 | $14.20 |
| .xyz | $13.50 | $13.50 |
| .io | $32.00 | $50.00 |
Cloudflare 賣的是成本價,不加價。價錢會變,以你當下看到的為準。
| 事情 | 說明 |
|---|---|
| 買不到 .tw、.com.tw | Cloudflare 的清單裡沒有,搜尋也不會出現 |
| 聯絡資料只能填英文和數字 | 官方規定。姓名、地址都用英文拼音 |
| 預設會自動續約 | 不想續可以在「網域 → 註冊」把「自動續訂」關掉 |
| 一定要收驗證信 | 沒驗證 Email,網域會被暫停 |
| 買了 60 天內不能轉走 | 要轉到別家註冊商得等 60 天 |
- 「網域 → 註冊」清單裡出現你的網域,狀態是「使用中」
把網域接到網站
-
1「Workers 和 Pages」→ 點你的專案 → 上方「自訂網域」分頁 → 按「設定自訂網域」
 1
2
-
2「網域」欄位填剛買的網域,例如
corgi-station.com→ 按「繼續」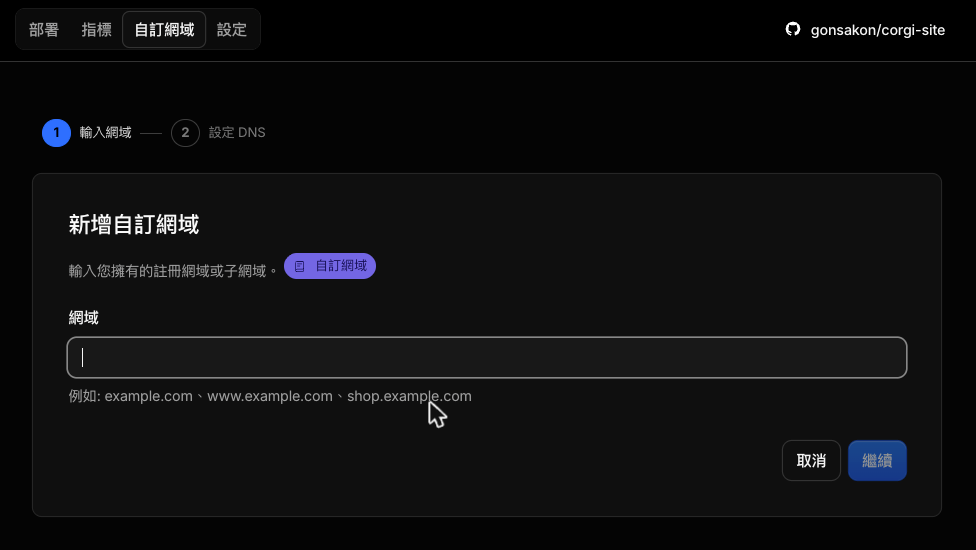 1
2
-
3下一步「設定 DNS」照畫面確認。網域是在 Cloudflare 買的,DNS 紀錄它會自動幫你加
-
4等狀態變成啟用,再打自己的網址試試看
-
5想讓
www.你的網域也能開:同樣的流程再做一次,這次填www.你的網域
最後:把設定檔的網址換成自己的網域
把 hugo.toml 的 baseURL 改成 https://我的網域/(結尾要有斜線),commit 之後 push。
- 瀏覽器打
https://你的網域/,開出來是你的網站,網址列有鎖頭
之後要改內容或外觀,就這 3 步
- 改文字:請 Claude Code 改
content/裡的檔案,或新增一篇文章。改外觀:請它改layouts/裡的版型 - 本機用
hugo server看一眼 git push,約 1 分鐘後正式網址就更新
推上 GitHub 之前,先看清楚你放了什麼
剛發生的例子(2026 年 11 月)
- 有旅遊平台做了一個給合作夥伴看的網站,被網友發現商品成交量、客單價、毛利率都看得到
- 報導指出,從網站內容和 GitHub 上的程式碼資料都能看到這些數據;事情傳開後,原網頁已無法存取
- 來源:聯合新聞網報導、Threads 原貼文
我們今天做的事一模一樣:把檔案推上 GitHub、部署成公開網站。所以同樣的事也可能發生在我們身上。
3 個容易誤會的地方
| 你以為 | 實際上 |
|---|---|
| repo 開公開,只有知道網址的人會看 | 公開 repo 的每個檔案、每一次修改紀錄,任何人都看得到 |
| repo 開私人就安全了 | 原始檔別人看不到,但部署出去的網站頁面,全世界都能開 |
| 檔案刪掉就沒事了 | Git 會留歷史紀錄,舊的 commit 裡還找得到 |
- 公司內部數據:業績、毛利、成本、客戶名單
- 個資:姓名+電話、Email 名單、訂單資料
- 金鑰和密碼:API key、
.env檔、帳號密碼
每次 push 之前,請 Claude Code 先檢查
推上 GitHub 之前,幫我檢查這個資料夾:

1. 有沒有金鑰、密碼、.env 檔。
2. 有沒有個資或公司內部數據(業績、毛利、客戶名單)。
3. 列出這次會被推上去的檔案給我看。

有問題先停下來告訴我,不要 push。
數發部資安署的「四個最小化」
| 原則 | 放到我們今天的網站 |
|---|---|
| ① 曝險最小化 | 不用的測試站、舊專案,從 Cloudflare 和 GitHub 刪掉 |
| ② 授權最小化 | Cloudflare 連 GitHub 時,只授權這一個 repo,不要全部 |
| ③ 漏洞最小化 | 發現放錯東西,馬上處理,不要等 |
| ④ 個資最小化 | 網站用不到的資料,一開始就不要放進資料夾 |
四個原則出自上面那篇報導引述的資安署提醒;右欄是對應到今天操作的做法。